Steps to Create a Group Membership #
This guide walks you through how to create a new group membership manually from the backend of your Agend AMS website.
- Navigate to your WordPress Admin dashboard.
- Go to Membership > Group Memberships.
- Click on Create New Group Membership.
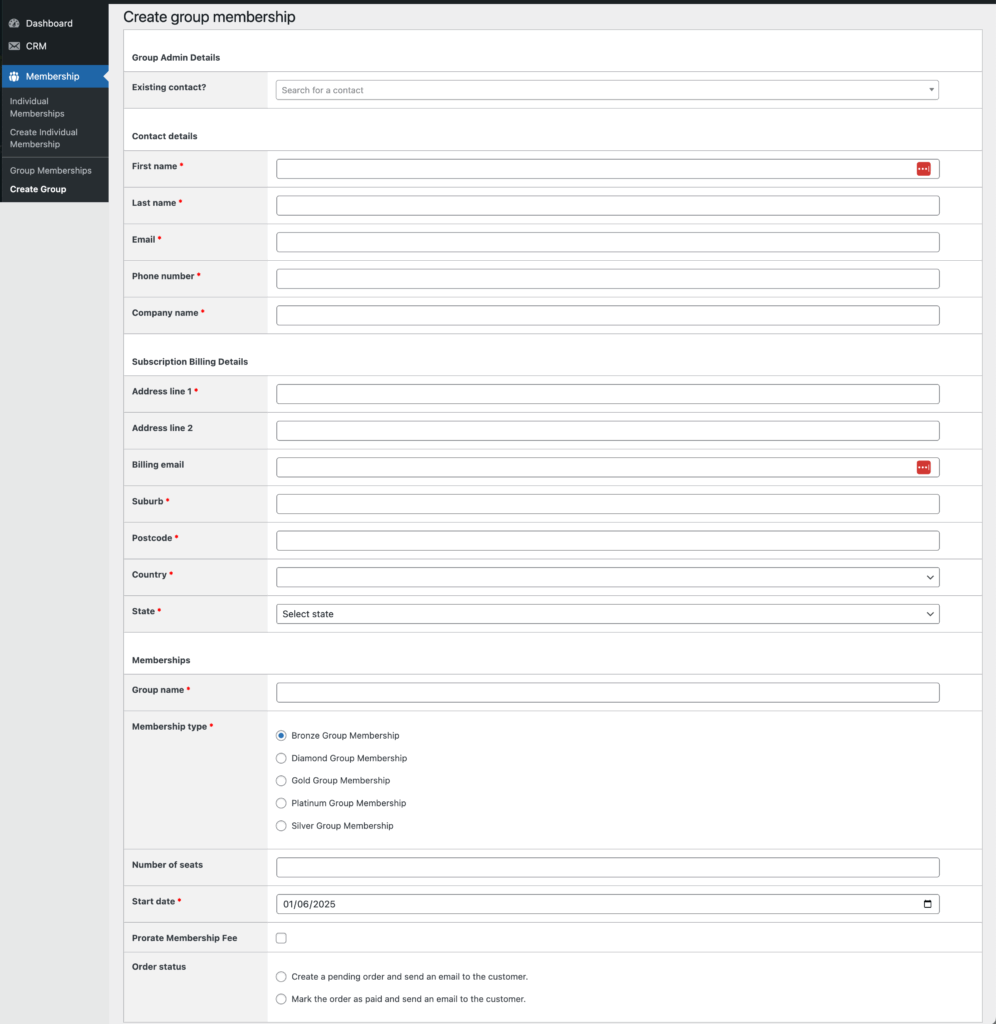
- Fill in the required details:
Group Admin Details #
- Existing Contact?
If the group admin already exists in your CRM, start typing their name or email to select them from the dropdown.
If not, leave this blank and fill in the details manually below.
Contact Details (Mandatory Fields) #
Complete all the required fields marked with a red asterisk:
- First Name
- Last Name
- Phone Number
- Company Name
These details create the admin/contact person for the group membership.
Subscription Billing Detail #
Fill in the billing details:
- Address Line 1
- Address Line 2 (optional)
- Billing Email
- Suburb
- Postcode
- Country (Dropdown)
- State (Dropdown)
These details are used for invoice generation and renewal notifications.

Memberships Section #
Fill out the membership-specific fields:
- Group Name
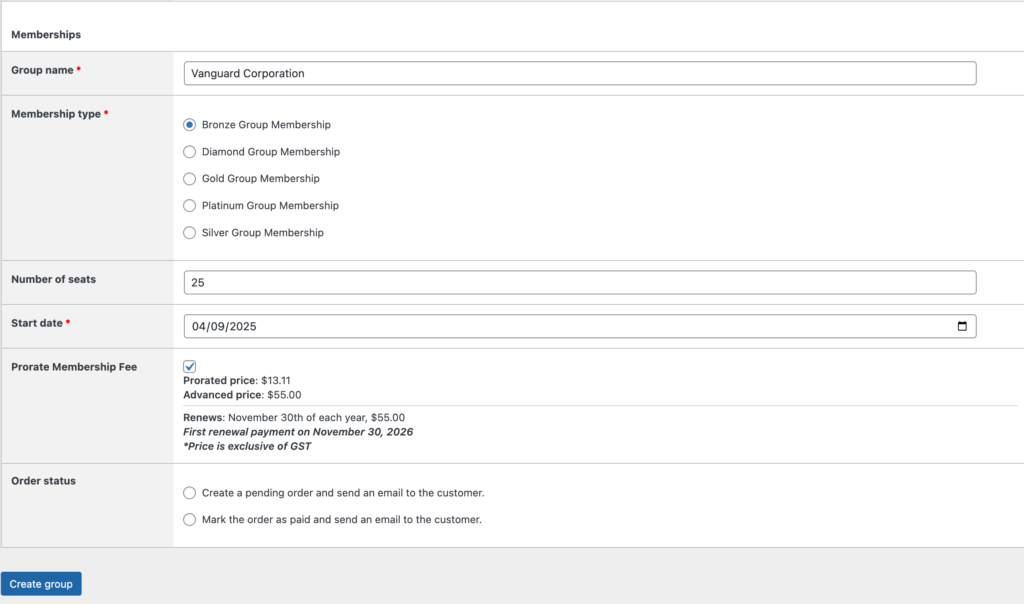
e.g. “Vanguard Corporation” - Membership Type
Choose the level of membership:- Bronze, Silver, Gold, Platinum, or Diamond
- Number of Seats
How many members this group will be able to allocate under their membership. - Start Date
When the membership will begin. - Prorate Membership Fee (Tick box)
Explained in the next section. - Order Status
Choose one:- Create a pending order (generates invoice and email)
- Mark order as paid (use if payment was already collected)
Membership Proration Fee – How It Works #
When a membership starts mid-year, the system calculates a prorated fee based on how many days are left in the current billing period.
If Prorate Membership Fee is checked:
- You’ll see two prices displayed:
- Prorated price – what the group pays today (e.g. $13.11)
- Advanced price – the full amount for next year (e.g. $55.00)
You’ll also see:
- Renewal Date – fixed (e.g. November 30 each year)
- First Renewal Payment Date – when the next full charge will occur (e.g. November 30, 2026)
This ensures fairness: you’re only charging for the remaining portion of the year, while locking in future billing.

Final Step: Create the Group #
Once everything is filled in:
Click the blue ‘Create group’ button at the bottom of the page.
The group will now be active, and the system will send any relevant emails (if selected).
Important Notes #
- Ensure that the Start Date is not set in the future.
- If the group membership is seat-based, ensure the correct number of seats is entered.
- If the membership requires payment, leaving the Order Status box unchecked will generate an order for the group admin to complete payment.


