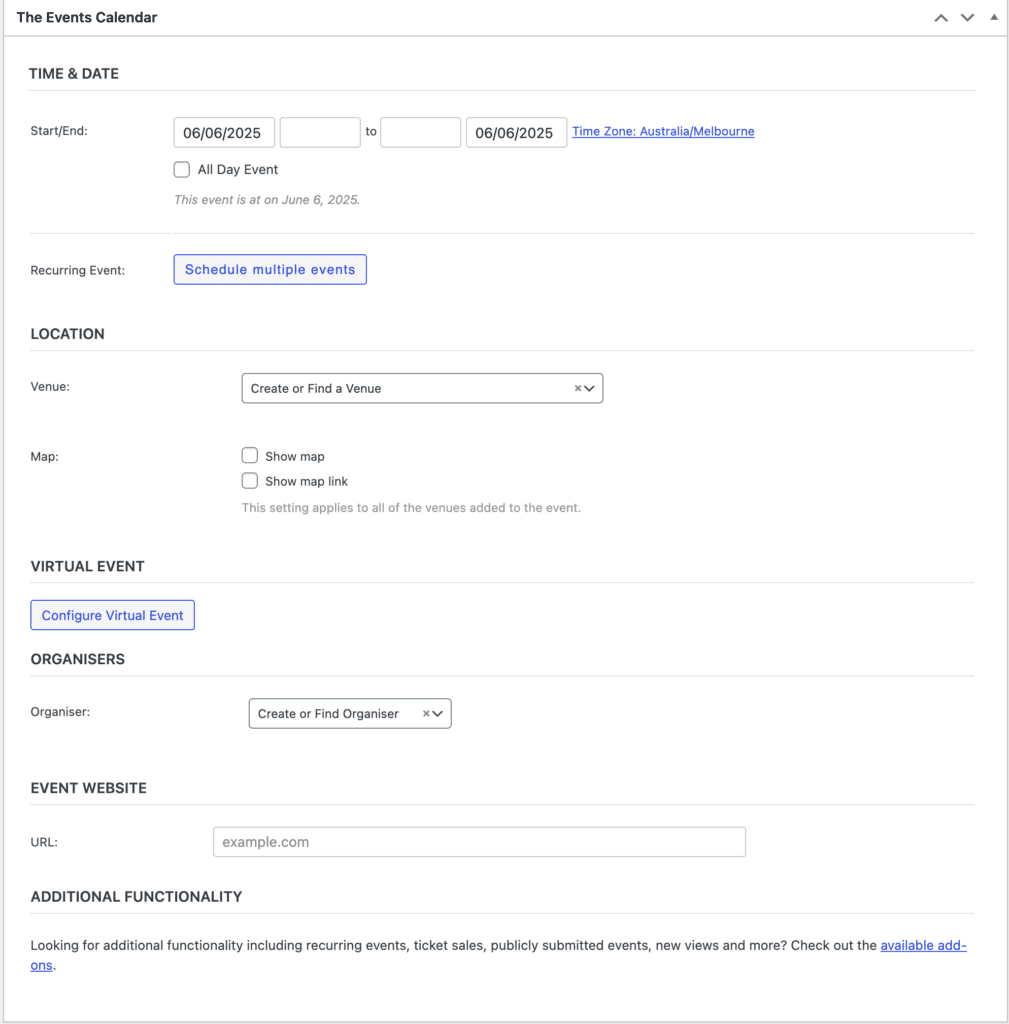
When creating or editing an event in Agend AMS, you’ll use the Event Setup Form (see screenshot) to enter the essential event details, including time, date, location, and virtual settings.
This form ensures your members and guests have accurate information and seamless access to in-person or online sessions.

TIME & DATE #
At the top of the form, you’ll see the Start/End fields.
- Set your event’s date and time precisely. You can also tick All Day Event if it’s not time-specific.
- The system automatically displays the local time zone (e.g., Australia/Melbourne), ensuring your attendees receive time-accurate information regardless of where they are located.
Example: For a full-day member conference on June 6th, simply enter 06/06/2025 and tick “All Day Event”.
RECURRING EVENTS #
Click Schedule multiple events if this session will occur on a recurring basis (e.g., monthly webinars, weekly networking groups).
This is ideal for committees or special interest groups holding regular meetups.
LOCATION #
Under Venue, you can:
- Create or select an existing venue, such as your association’s office, a hired conference centre, or a regular partner’s location.
- Optionally tick:
- Show map – displays the venue map on the event page.
- Show map link – includes a clickable map link for attendees.
Great for hybrid events – make sure physical attendees can find the location easily!
VIRTUAL EVENT CONFIGURATION #
Click Configure Virtual Event to add access details for online attendees.
- Add your platform’s link (Zoom, MS Teams, or similar).
- This information can be hidden or shown to users based on registration settings.
Perfect for member-only webinars or online workshops.
ORGANISERS #
Under Organiser, select an existing organiser or create a new one.
- This could be your Events Officer, a guest speaker, or even the name of a partner organisation.
Displaying the organiser helps members know who to contact or expect at the event.
EVENT WEBSITE #
Use the URL field to:
- Link to an external organiser’s registration page (if the event is hosted off-site).
- Redirect users to a landing page with more information.
- Track traffic from your main events calendar to a specific site.
For example, if you’re collaborating with a national industry partner, you may link to their event platform for ticketing.
Summary of What You Can Configure #
| Field | Purpose |
|---|---|
| Time & Date | Controls start/end of the event |
| Recurrence | Ideal for ongoing sessions |
| Location | For in-person events with maps |
| Virtual Link | For online participation |
| Organiser | Add context and contact |
| Website URL | Redirect or provide more detail |
Pro Tip #
Always review and preview your event before publishing. This helps ensure all details (venue, time, link, etc.) display properly for both members and non-members.
Would you like a printable checklist to go along with this for event managers in your team?


